Debian 13 Trixie Post Install Guide: Essential Steps, Drivers, and Tweaks
Just installed Debian 13 Trixie? Follow this complete post-install guide to set up drivers, codecs, software, Flatpak, NVIDIA/AMD support, and system tweaks for a smooth Linux experience.
Debian 13 Trixie Post-Install Guide
Just installed Debian 13 Trixie? This guide will walk you through the essential post-install steps to get your system ready for daily use, including installing drivers, codecs, useful software, Flatpak apps, and tweaking system settings for optimal performance.
01. Add yourself to sudoers group
Check if you have sudo access. If you have than you can skip this step.
1

sudo whoami
If you don’t have sudo access. Than -
- Switch to root
1

su -
- Add your user to
sudogroup1
usermod -aG sudo your_username
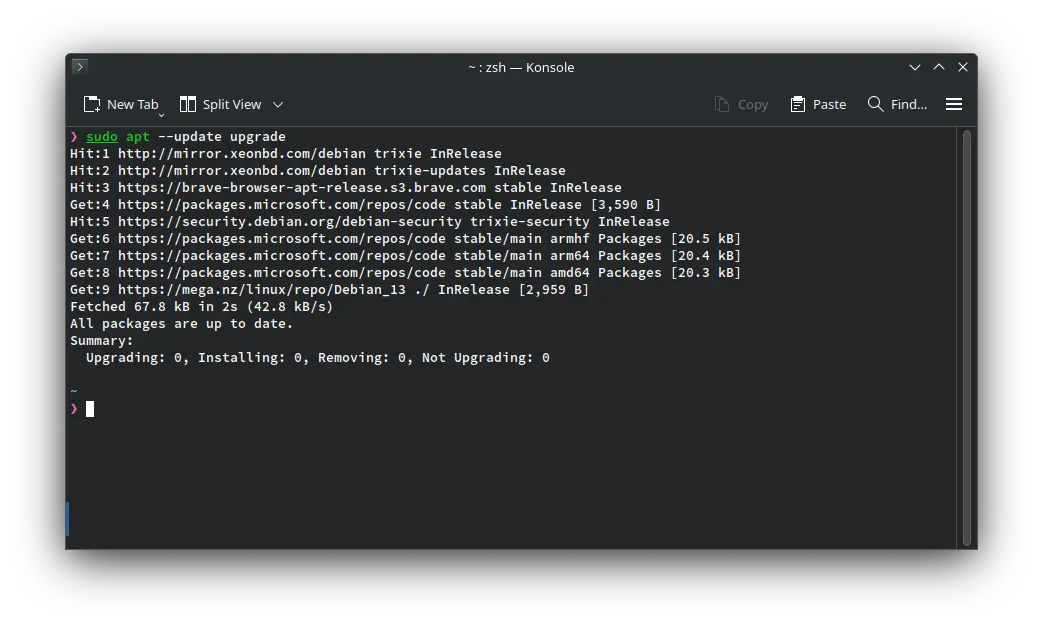
02. Update and upgrade system
From Debian 13 a new short way to update and upgrade your system.
1

sudo apt --update upgrade
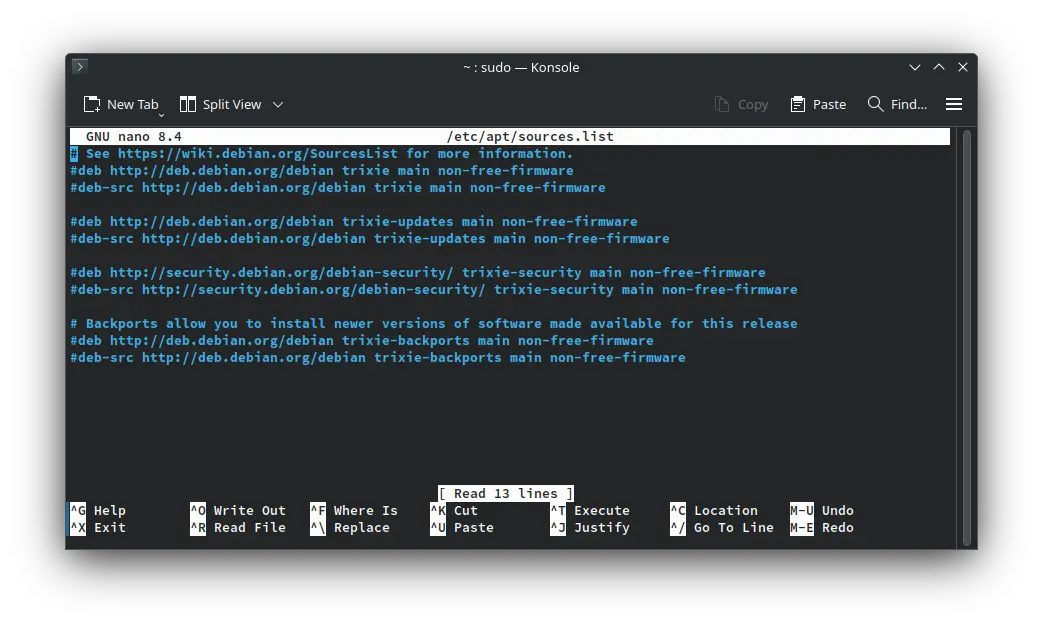
03. Change sources to more readable format
One of the notable changes in Debian 13 Trixie is how the package management sources are handled. In previous Debian releases, users would typically manage their repositories by editing the /etc/apt/sources.list file directly. However, in Debian 13, the system now prefers the declarative sources.list.d/debian.sources format.
Comment out old sources
In Debian 13 Trixie, the old repository file /etc/apt/sources.list is no longer the main way to manage package sources. Before you start using the new .sources files, it’s a good idea to comment out every line in the old file to avoid conflicts.
To do this, open the file with a text editor, for example:
1

sudo nano /etc/apt/sources.list
Then, add a # at the beginning of every line. For example, change:
1
2

#deb http://deb.debian.org/debian trixie main contrib non-free
#deb http://deb.debian.org/debian-security trixie-security main contrib non-free
Create new sources file
Create new file in /etc/apt/sources.list.d/debian.sources. And put
1
2
3
4
5
6
7
8
9
10
11
12
13

Types: deb deb-src
URIs: https://deb.debian.org/debian
Suites: trixie trixie-updates
Components: main contrib non-free non-free-firmware
Enabled: yes
Signed-By: /usr/share/keyrings/debian-archive-keyring.gpg

Types: deb deb-src
URIs: https://security.debian.org/debian-security
Suites: trixie-security
Components: main contrib non-free non-free-firmware
Enabled: yes
Signed-By: /usr/share/keyrings/debian-archive-keyring.gpg
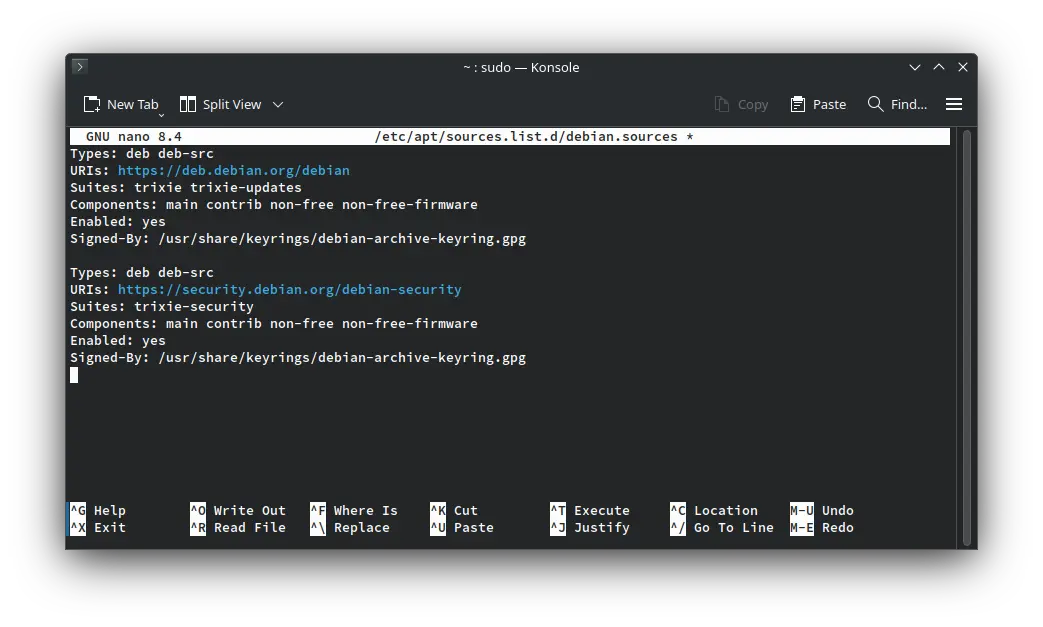
Note that we put non-free and non-free-firmware for more packages.
Now let’s use the new short way to update and upgrade.
1

sudo apt --update upgrade
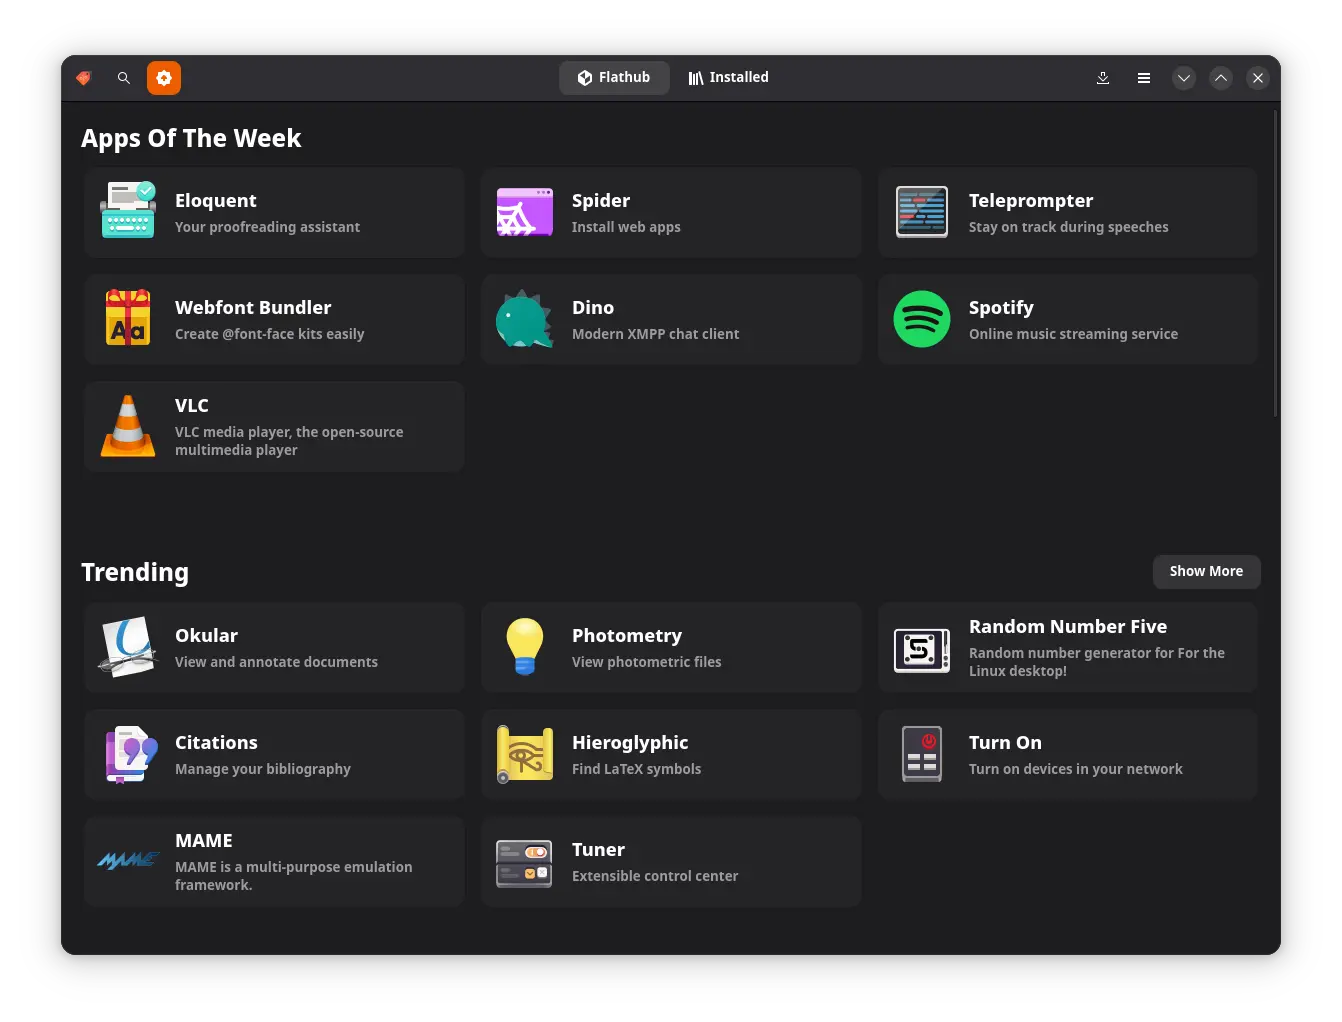
04. Install Flatpak and Snap
On Debian you no longer have to be stucked on old applications. If you install them from flatpak or snap you will have latest versions of the softwares.
Flatpak
Let’s install flatpak and flathub repo.
1
2

sudo apt install flatpak
flatpak remote-add --if-not-exists flathub https://dl.flathub.org/repo/flathub.flatpakrepo
You can integrate flatpak with your existing software center.
For GNOME
1

sudo apt install gnome-software-plugin-flatpak
For KDE
1

sudo apt install plasma-discover-backend-flatpak
But you can also have seperate Flathub store called Bazaar.
1

flatpak install flathub io.github.kolunmi.Bazaar
Install flatpak permission manager
1

flatpak install flathub com.github.tchx84.Flatseal
Snap
Install snap
1

sudo apt install snapd
You will need to reboot your system to properly integrate.
If You have Gnome Software installed. You can install snap backend to manage snaps.
1

sudo apt install gnome-software-plugin-snap
If you’re using KDE Plasma Discover
1

sudo apt install plasma-discover-backend-snap
You can install seperate snap store too.
1

sudo snap install snap-store
05. Enable Magick SysRq - REISUB for Emergency reboot
We all face this issue in any machine. Sometimes the computer feels like to get stuck itself.
In circumstances like that we can emergency reboot.
For that we have to enable SysRq key.
Add the following line to the /etc/sysctl.d/90-sysrq.conf file:
1

kernel.sysrq = 1
In case your system freezes, you can safely reboot it using the REISUB sequence:
Hold down Alt + SysRq (Print Screen key).
While holding them, type the following keys in order: R, E, I, S, U, B.
The PC should reboot itself.
06. Microsoft Fonts and alternatives for “Cambria, Calibri”
1

sudo apt install ttf-mscorefonts-installer fonts-crosextra-caladea fonts-crosextra-carlito
07. Install Nvidia drivers.
Debian has complete instruction for installing Nvidia drivers. I will give you tldr.
Install kernel headers
1

sudo apt install linux-headers-amd64
If your NVIDIA GPU is older than RTX 2000 Series. Than install proprietary flavour of driver.
1

sudo apt install nvidia-kernel-dkms nvidia-driver firmware-misc-nonfree
If you have RTX 2000 and above. Use the Open flavour of driver.
1

sudo apt install nvidia-open-kernel-dkms nvidia-driver firmware-misc-nonfree
Restart your system after 5 mins to load the new driver.
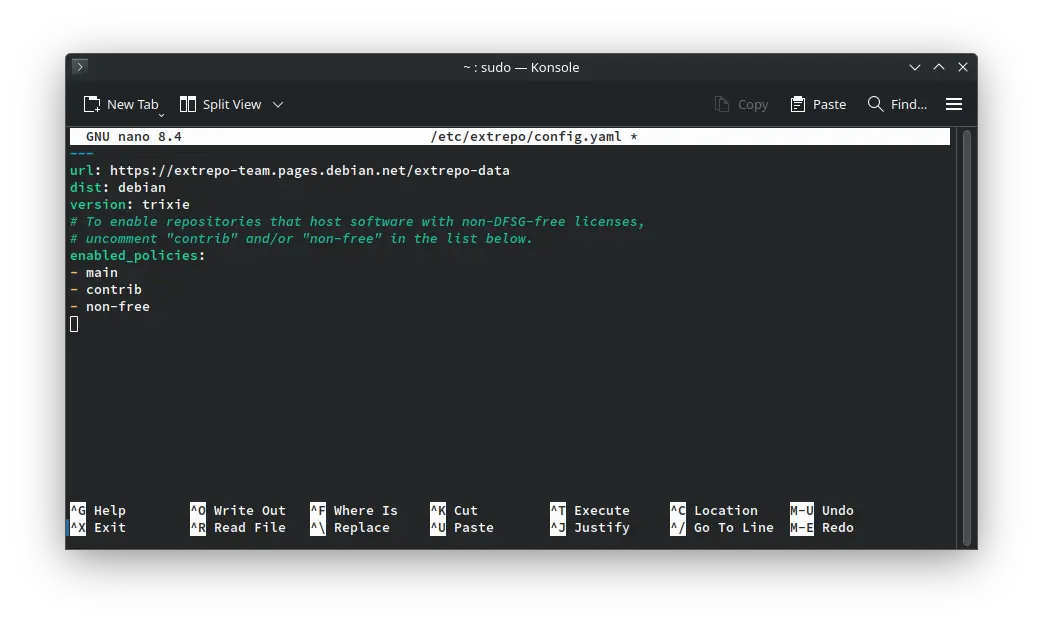
08. Install 3rd party apps using extrepo
Debian 13 has little advertised package called extrepo. This package can enables 3rd party repo easily. No more meddeling with curl and other scripts. The list of 3rd party apps that is available in extrepo apps can be found here. You can see it has popular apps like vscode, sublime text, spotify, Signal etc. Note that this repos are managed by debian salsa team. So, we can say these are safe to use.
Let’s install it:
1

sudo apt install extrepo
Uncomment - contrib and - non-free lines in /etc/extrepo/config.yaml.
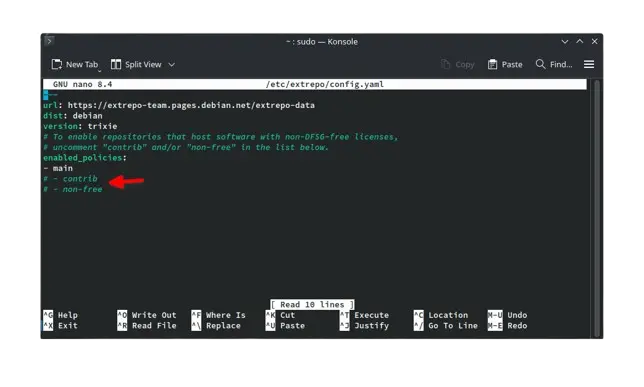
It should look like this:
You can list what apps available in extrepo
1

extrepo search | grep Found | sed 's/Found//g' | sed 's/://g' | sort
This little trick was mentioned by a reddit user
Install Brave browser, Google Chrome or Firefox using extrepo.
For Brave
1
2
3
4
5

sudo extrepo update
sudo extrepo search brave
sudo extrepo enable brave_release
sudo apt --update upgrade
sudo apt install brave-browser
For Chrome
1
2
3
4
5

sudo extrepo update
sudo extrepo search chrome
sudo extrepo enable google_chrome
sudo apt --update upgrade
sudo apt install google-chrome-stable
For Firefox
1
2
3
4

sudo extrepo search mozilla
sudo extrepo enable mozilla
sudo apt --update upgrade
sudo apt install firefox
disabling is similar.
1

sudo extrepo disable google_chrome
09. Install some apps recommanded apps
These are some recommanded apps that I install on every distro. You can pick and choose
1
2
3
4
5
6
7
8

sudo apt install \
  vlc \
  mpv \
  libreoffice \
  htop \
  fastfetch \
  torbrowser-launcher \
  wget
I would suggest install 3rd party apps like Telegram, Signal, Discord from Verified flatpak or snaps repo.
10. Install qbittorrent: Playing with podman quadlets
This one is optional. But on every system I like to use qbittorrent using podman quadlets feature. On Debian 13 podman now has 5.4.2. What it does is it uses systemd to control podman. So, I can install and use qbittorrent webui.
Install podman
1

sudo apt install podman
pull qbittorrent-nox
1

podman pull docker.io/qbittorrentofficial/qbittorrent-nox:latest
Create this quadlet ~/config/containers/systemd/qbittorrent-nox.container
put this inside:
1
2
3
4
5
6
7
8
9
10
11
12
13
14
15
16
17
18
19
20
21
22
23
24
25
26

[Container]
Image=docker.io/qbittorrentofficial/qbittorrent-nox:latest

AutoUpdate=registry
PublishPort=58080:58080
PublishPort=6881:6881
PublishPort=6881:6881/udp
Timezone=Asia/Dhaka

Environment=PUID=1000
Environment=PGID=1000
Environment=QBT_WEBUI_PORT=58080

Volume=qbittorrent-config:/config
Volume=%h/Downloads:/downloads:Z

User=root
UserNS=keep-id
Network=host

[Service]
Restart=on-failure
TimeoutStartSec=900

[Install]
WantedBy=default.target
You can play with this config. Try changing the port.
Here are more quadlets to play with.
Start the quadlet
1
2

systemctl --user daemon-reload
systemctl --user start qbittorrent-nox
You can access the qbittorrent webui in http://localhost://58080
The initial user pass can be found using
1

podman logs -f systemd-qbittorrent-nox
With these post-install steps, your Debian 13 Trixie system is now fully optimized, secure, and ready for daily use. Explore, customize, and enjoy the stability and power of Debian. Happy computing!